
Optical Meters
This guide explains how applications can implement reliable onboarding and troubleshooting flows for optical meter connections, using the CE-API.
It complements the API reference by describing how multiple endpoints work together, depending on the hardware setup used.
Supported hardware setups
For meters with an optical interface, a smart device is required to collect meter data. There are two different hardware setups available, depending on the availability of a power socket near the meter cabinet, as well as the proximity to the household's Wi-Fi network:
Optical Direct
The SmartBridge (SBLR****) is directly connected to the meter via an optical probe as illustrated in the following picture:
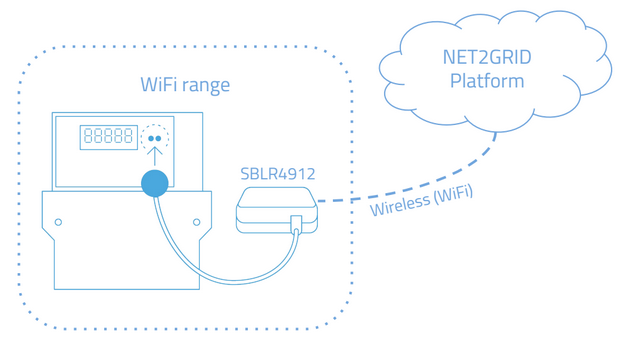
The relevant endpoint for this hardware setup is the GET /opticalsmartbridge/status .
Optical LoRa (via SmartReader)
In this setup two devices are required:
- The SmartBridge (SPLR**/ SBLR**): responsible for transmitting the energy data to EnergyAI cloud.
- The SmartReader (SRLR****): responsible for reading the meter's optical interface and data to the SmartBridge via a long range wireless network (LoRa).
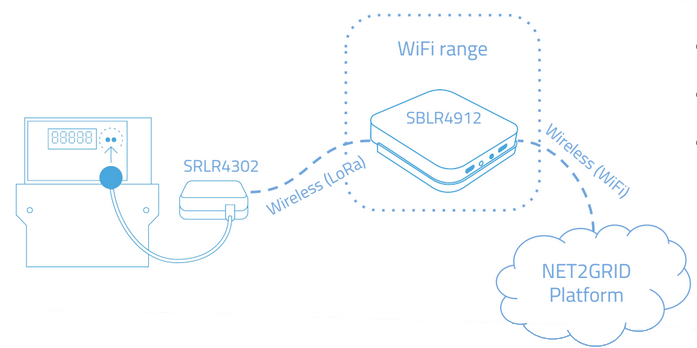
The CE-API endpoint relevant to this hardware setup is the GET /meterreader/status
The application must always follow the API endpoint that corresponds to the active or last known hardware setup.
High-level app flow
1. Bring the SmartBridge online
Complete the SmartBridge onboarding process and ensure the device is associated to the user's account and is connected to the internet.
2. Determine the last known hardware setup
The endpoint used to assess device status depends on the hardware setup used by the customer.
If EnergyAI has detected a successful meter connection in the past, it reports the hardware setup that was used. This allows apps to provide a seamless experience for users with an existing setup, without repeatedly asking them to confirm how their meter is connected each time the app loads.
Only in the case of a brand-new connection, where no successful setup has been detected before, should the app ask the user which hardware setup they are about to use and then follow the corresponding onboarding flow.
The last known hardware setup can be retrieved from the
GET /smartbridge/status endpoint, using the last_valid_connection_mode field.
For optical meters, the relevant values are:
"optical direct""optical lora""unknown"— no previous successful optical meter setup was identified by EnergyAI
Any other value indicates that a different type of hardware setup is in use and is not applicable to optical meter connections.
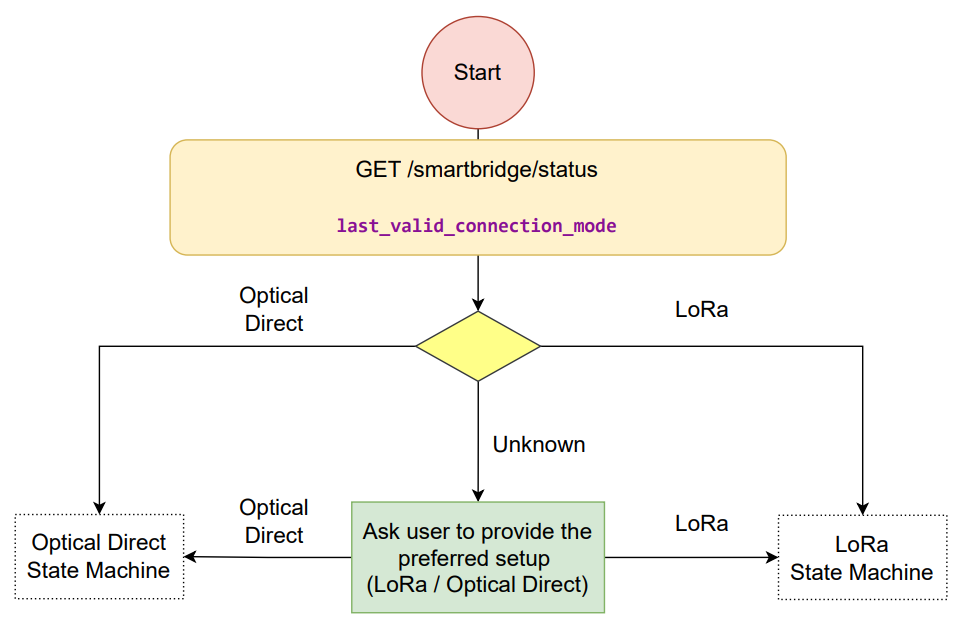
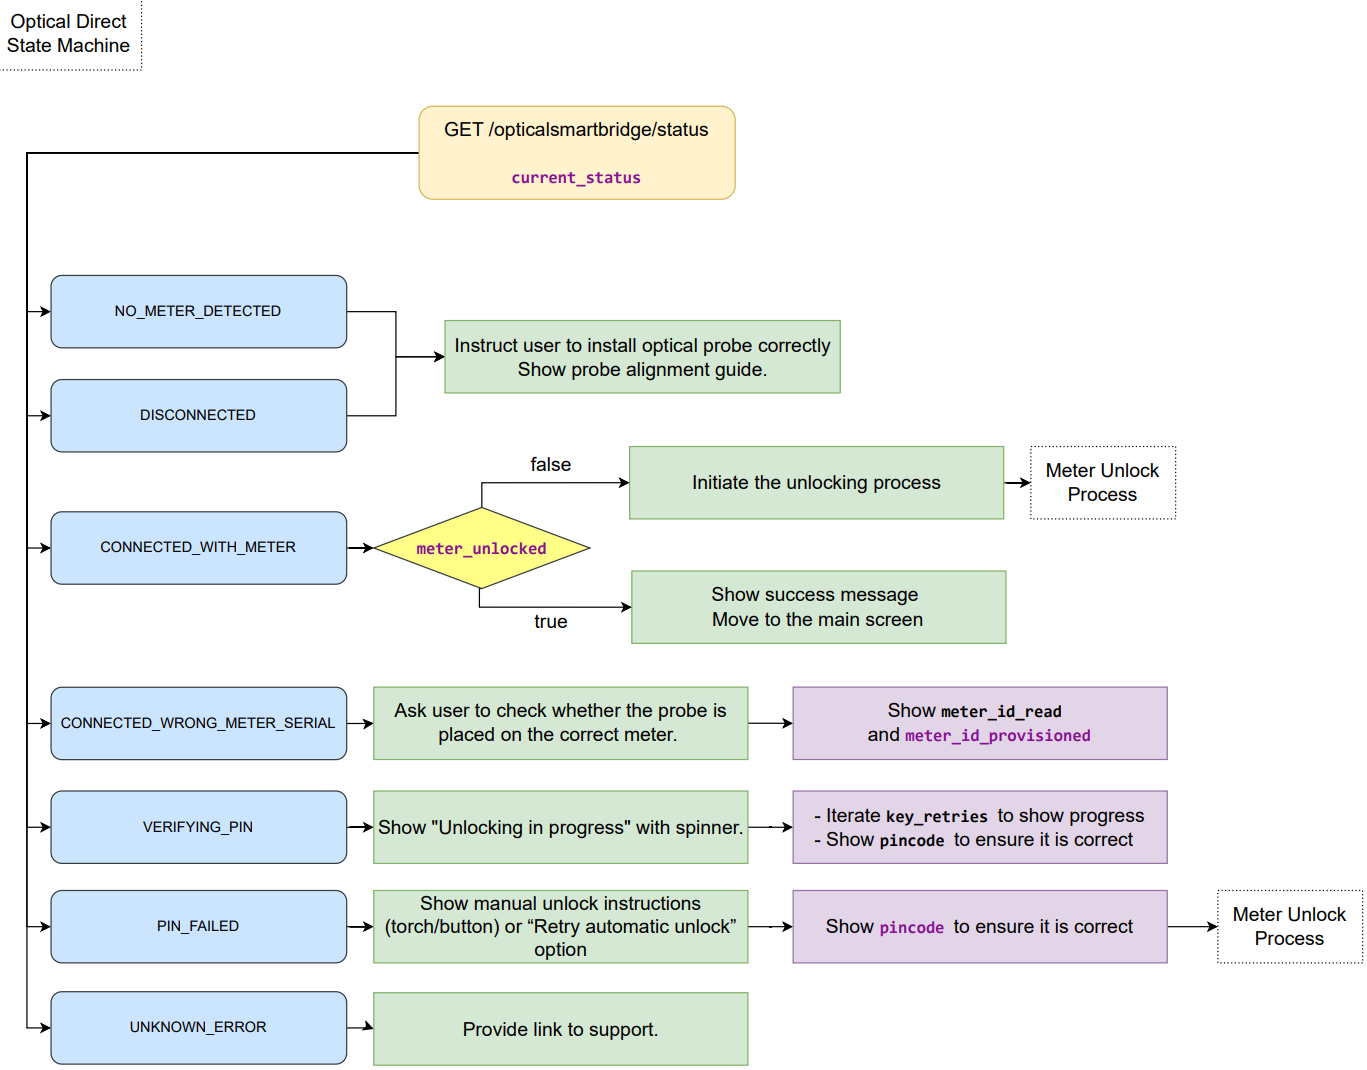
3. Optical Direct State Machine
In case the last known hardware setup is optical direct, then the GET /opticalsmartbridge/status endpoint should be used to support the corresponding state machine:
4. Optical LoRa State Machine
In case the last known hardware setup is optical lora, then the GET /meterreader/status endpoint should be used to support the corresponding state machine:
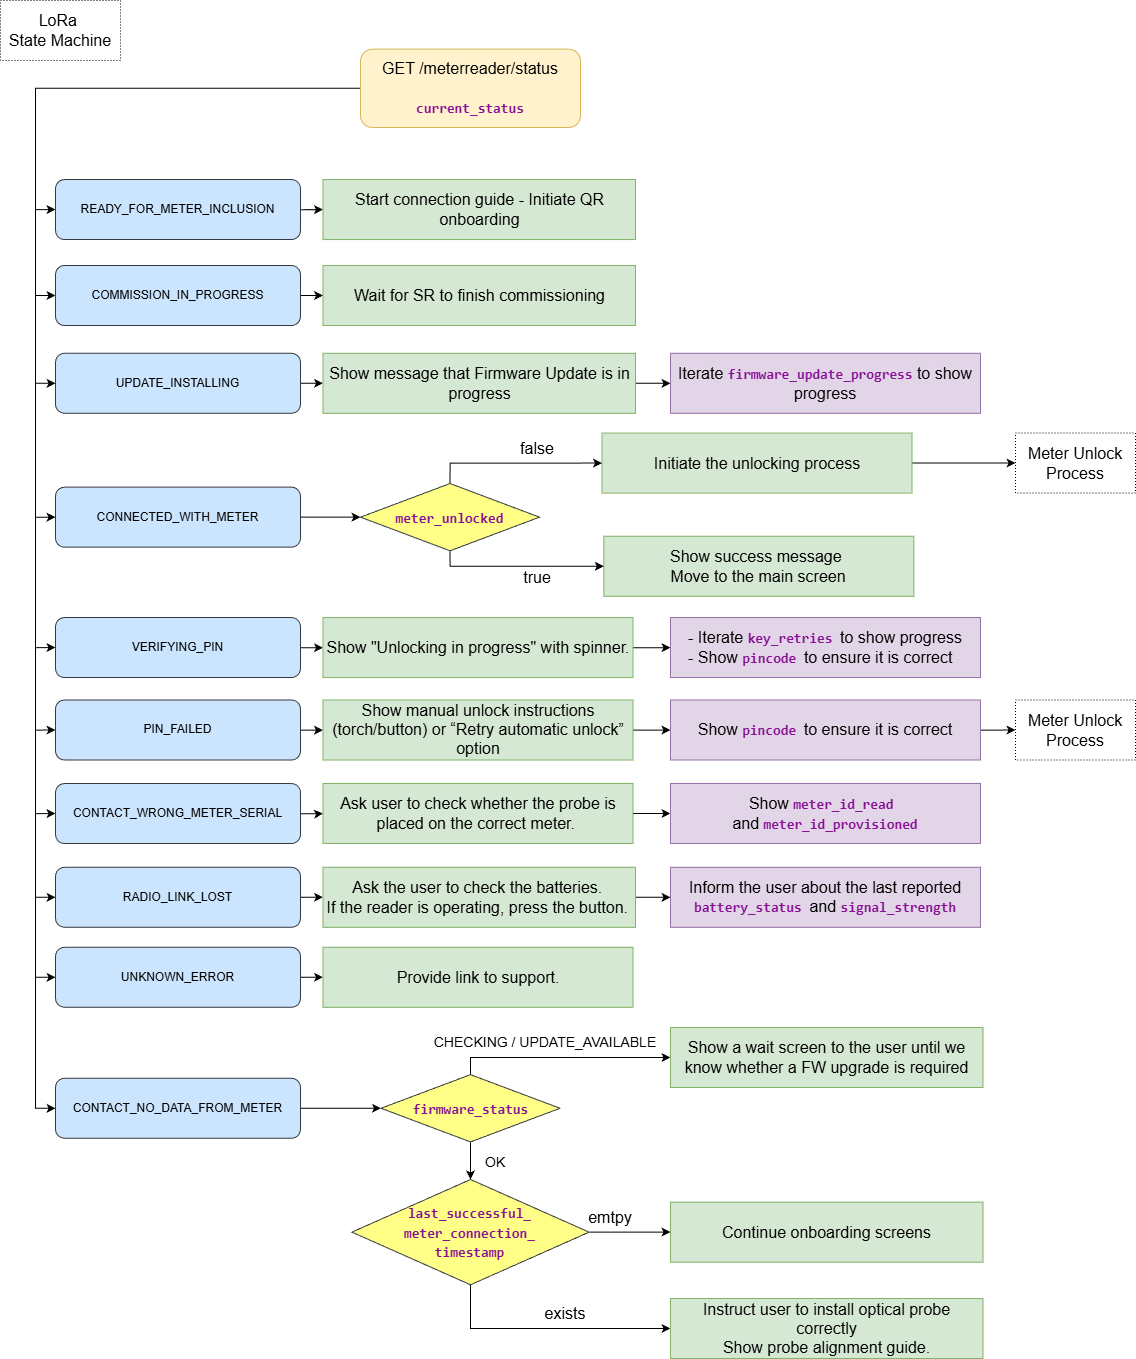
Key points to consider for the Optical LoRa setup:
-
Firmware Update:
During initial onboarding, the SmartReader will most likely require a firmware update. It is recommended that the user brings the reader close to the SmartBridge during this step ensure the firmware transfer over LoRa completes without problems. Once the update completes, the reader can be placed in the meter cabinet.
Firmware updates are transmitted from the SmartBridge to the reader over LoRa and may take over 30 minutes minutes to complete. During this period, the reader is temporarily unreachable and energy measurements cannot be sent to the backend.
-
Radio Link Lost timing:
The
RADIO_LINK_LOSTstatus is reported only after approximately 2 hours without a successful communication. Short interruptions or temporary reachability issues will not immediately result in this status.
5. Unlocking the meter
Most optical meters are locked by default and require a PIN code to expose detailed consumption data (such as real-time wattage), beyond the basic cumulative kWh reading.
Meter manufacturers support different unlocking methods. Some meters can be unlocked manually using a physical button, while others require the user to shine pulses of light onto the meter’s optical sensor (photocell). Each light pulse increments a digit (for example, five flashes correspond to the digit 5).
For supported meters, the NET2GRID devices can perform this unlocking process automatically. Using the optical probe, EnergyAI sends the required light pulses directly to the meter without user interaction. The only input required is the user’s PIN code. EnergyAI will attempt to unlock the meter up to seven times, applying different configurations to maximize the chance of success.
The unlocking procedure is identical for both hardware setups (Optical Direct and Optical LoRa) and is illustrated in the flow diagram below.
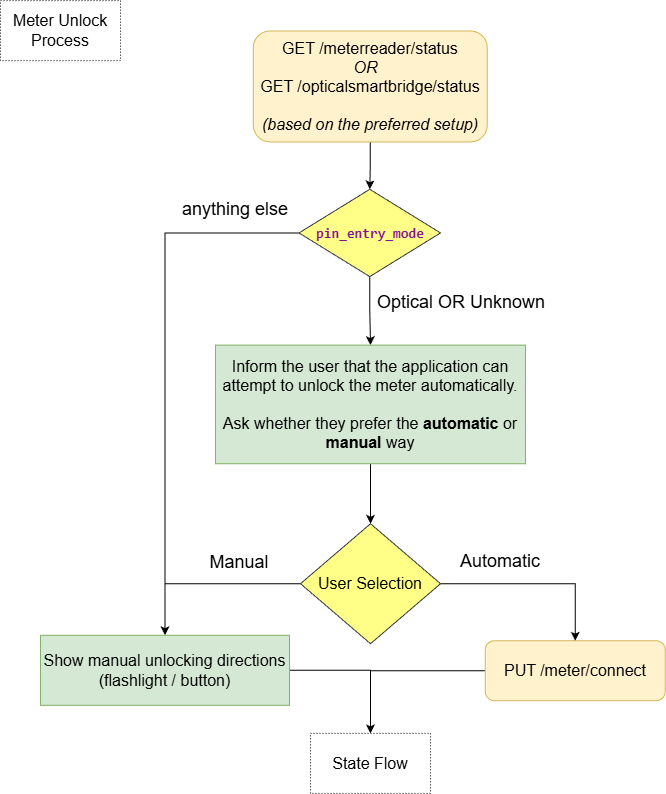
Some meters may lock again after events such as a power outage. Apps should always assess the meter’s unlock state via the CE-API and guide the user through the unlocking process again if required.
6. Changing hardware setup
Some customers who initially use the Optical LoRa setup may later discover that their SmartBridge can be placed close enough to the meter to allow a direct optical connection. Switching to the Optical Direct setup enables higher-granularity, real-time power data and reduces operational complexity, as the LoRa SmartReader is no longer required.
To switch from Optical LoRa to Optical Direct, the user should follow these steps:
- Power off the SmartReader device
- Remove the optical probe from the SmartReader
- Connect the optical probe directly to the SmartBridge
- Place the SmartBridge close to the meter
- Reboot the SmartBridge (if only the bridge was not powered off in any of the previous steps)
Once these steps are completed, EnergyAI will automatically detect the new hardware setup. The updated configuration will be reflected in the response of the GET /smartbridge/status endpoint.
Only SmartBridges of type SBLR**** can be used in the Optical Direct setup. Devices of type SPLR**** must operate together with a SmartReader via LoRa.
7. Onboarding vs troubleshooting detection
Apps can reliably distinguish between first-time onboarding and issues after a working setup using the last_successful_meter_connection_timestamp that is available in both endpoints:
This attribute indicates when was the last time when EnergyAI detected a successful connection with the meter.
Interpretation
| Timestamp | Meaning |
|---|---|
| Empty | Meter has never been successfully connected → onboarding flow |
| Present | Meter worked in the past → troubleshooting flow |
This allows apps to show different screens, instructions, and tone depending on the situation.
EnergyAI reports the
last_successful_meter_connection_timestamponly for the hardware setup that is most recently used.e.g. If the last hardware setup is
optical directthe field will be present only in theGET /opticalsmartbridge/statusendpoint and NOT inGET /meterreader/status.
8. Polling recommendations
During onboarding or active troubleshooting
- Poll every 3–5 seconds
- This ensures fast feedback while the user is performing guided actions (e.g. attaching the probe, entering a PIN, waiting for commissioning).
During blocking or long-running operations
- When the API reports states such as firmware update in progress, apps should:
- Avoid aggressive polling
- Poll every 10–20 seconds
- Display a waiting state to the user
After a successful meter connection
- Reduce polling frequency to 10–20 seconds
- This minimizes backend load while maintaining sufficient observability.
Updated 6 months ago